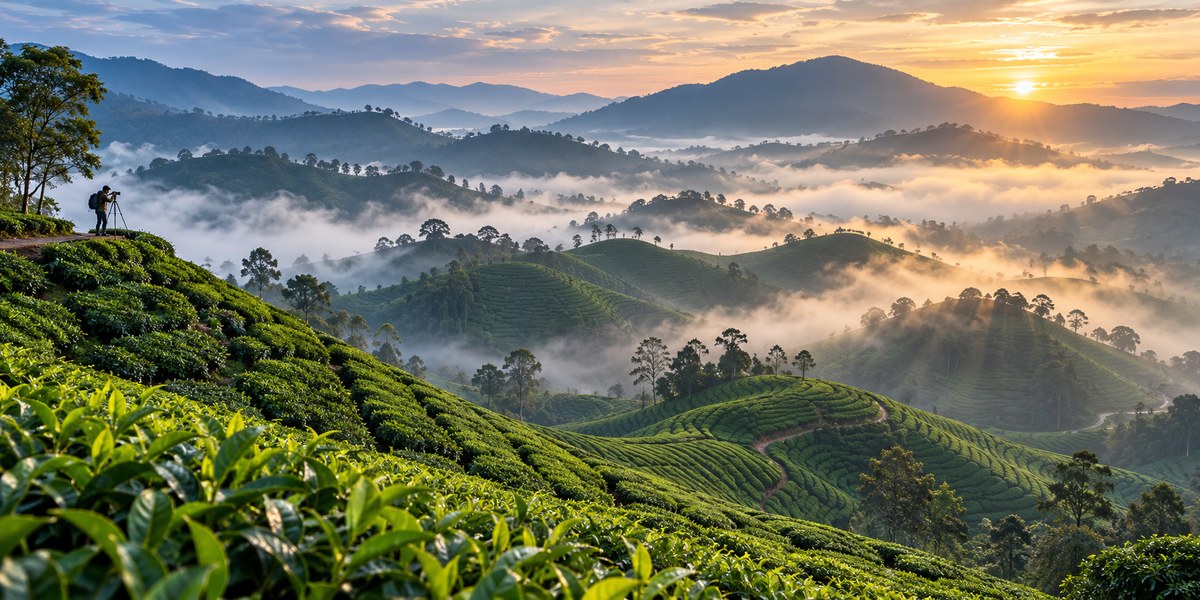
The first time you see the sun break through the clouds over a tea plantation in Cameron Highlands, you will understand why this place lives in the imagination of landscape photographers. The light turns the rolling hills into layers of green and silver. The air carries the scent of wet earth and fresh leaves. This is not a place you just visit. It is a place you learn to read.
Cameron Highlands offers a rare combination of mist, tea terraces, and soft highland light that is ideal for landscape photography. Success depends on timing the morning fog, using a telephoto lens for compression, and knowing where the best viewpoints sit. This guide covers locations, gear, and techniques to help you plan your trip.
Why the Mist Matters More Than the Sun
Many photographers chase golden hour. In Cameron Highlands, the real magic happens when the sun is still low and the valley fog has not burned off yet. The mist acts like a giant diffuser. It softens harsh shadows and adds depth to every ridge line.
The best light for Cameron Highlands landscape photography often occurs between 6:30 AM and 9:00 AM. During this window, the temperature difference between the valley and the hills creates a layer of fog that sits just above the tea bushes. That fog is your best tool for creating separation between foreground and background elements.
If you wait until 10 AM, the sun burns through and the scene becomes flat and high contrast. The mist is what gives these images their moody, layered look. Without it, you are just shooting green hills.
The Three Essential Locations
You do not need to cover the entire highlands to come home with strong images. Focus on these three spots.
1. BOH Tea Plantation (Sungei Palas)
This is the most photographed location in the highlands for a reason. The main viewpoint looks down over terraced slopes that stretch into the valley. The best compositions come from the walking paths below the main visitor center, not from the platform itself.
Arrive before 7 AM. The gate to the parking lot opens early, but the tea center does not open until 9 AM. That is fine. You want to be on the paths during the first light.
2. Cameron Valley Tea Plantation
Less crowded than BOH, this plantation offers a more intimate perspective. The rows of tea bushes curve along the hillside in sweeping lines. A 70-200mm lens works well here to compress the rows and create patterns.
3. Mossy Forest at Gunung Brinchang
This is a completely different environment. The mossy forest sits at over 2,000 meters elevation. The trees are covered in thick layers of moss and lichen. Fog rolls through constantly. It feels like a set from a fantasy film.
Use a wide-angle lens here. The twisted tree trunks and hanging moss create natural frames. A polarizer helps cut the glare off wet leaves.
Gear Checklist for the Highlands
The conditions in Cameron Highlands are humid and changeable. Pack accordingly.
- Rain cover for your camera. It will rain at least once during your trip. Do not let that stop you from shooting.
- A sturdy tripod. The light in the forest and during early morning requires longer exposures.
- Lens choices. A standard zoom (24-70mm) covers the wide scenes. A telephoto zoom (70-200mm or 100-400mm) is essential for compressing the tea terraces.
- Circular polarizer. This cuts through the haze and deepens the green of the tea leaves.
- Microfiber cloths. Humidity will fog your lens. Wipe it often.
For a deeper look at what to bring, read our guide on choosing the perfect camera gear for capturing Asia’s stunning landscapes.
Common Mistakes and How to Fix Them
Here is a table of the most frequent errors photographers make in the highlands and how to correct them.
| Mistake | Why It Happens | The Fix |
|---|---|---|
| Overexposed fog | The camera meter reads the dark green tea bushes and brightens the fog to white. | Use exposure compensation at -0.7 to -1.3 EV. Check your histogram. |
| Flat composition | Shooting from the main viewpoint without moving. | Walk along the terraces. Find a foreground element like a single bush or a path. |
| Missed mist | Sleeping in until 8 AM. | Set your alarm for 5:30 AM. The best mist is gone by 9 AM. |
| Lens fog | Moving from a cold car into humid air. | Let your gear acclimate inside the bag for 15 minutes before shooting. |
A Simple Morning Workflow
Follow this process to make the most of your first morning.
- Scout the evening before. Drive to your chosen location in the late afternoon. Note where the sun will rise and where the paths lead.
- Set up before sunrise. Arrive at least 30 minutes before first light. Get your tripod level and frame your shot.
- Shoot through the transition. Start shooting as soon as there is enough light. Do not wait for the “perfect” moment. The mist changes every few minutes.
- Bracket your exposures. The dynamic range between the bright sky and dark foliage is wide. Shoot three frames at -2, 0, and +2 EV for later blending.
- Review and adjust. After the first hour, look at your images on the back of the camera. Are the shadows too dark? Is the fog blown out? Adjust your settings for the next location.
Techniques for Misty Landscapes
Mist changes how you approach composition. Here are specific techniques that work well in Cameron Highlands.
- Use negative space. Let the fog fill a large portion of the frame. The empty space gives the image a sense of scale and mystery.
- Look for layers. Position yourself so that the hills stack behind each other. Each layer should be a different shade of green or gray.
- Include a human element. A worker in the tea fields or a small hut gives the viewer a reference point. It makes the vast landscape feel real.
- Shoot in black and white. The mist and fog create natural high-key and low-key areas. Converting to monochrome can simplify a busy scene.
If you want to build on these skills, our article on mastering the art of golden hour landscape photography in Asia covers timing and light in more detail.
When to Visit in 2026
The dry season runs from February to April and again from June to September. These months offer the most consistent morning fog and fewer rain interruptions.
Avoid the school holiday periods in March and August if you want fewer tourists in your frames. The tea plantations are popular with local visitors during those weeks.
“The fog in Cameron Highlands is not an obstacle. It is the subject. Learn to work with it, and your images will stand out from every other green hillside shot.” — veteran landscape photographer based in Kuala Lumpur
Post-Processing Tips for Highland Light
The raw files from the highlands often look flat. That is normal. The mist reduces contrast. Your editing should bring back depth without making the image look artificial.
- Raise the shadows. The tea bushes in the foreground will be dark. Lift them carefully to reveal detail.
- Lower the highlights. The fog should stay white but not clipped. Use the highlight slider to bring back texture.
- Increase clarity selectively. Apply clarity only to the midtones. Too much clarity on the fog creates ugly halos.
- Add a slight blue tint to the shadows. This enhances the cool, misty mood.
For a full walkthrough of editing techniques, check out our guide on mastering Asian landscape photography edits for stunning results.
Stay Flexible and Watch the Weather
The highlands have their own microclimate. A clear forecast can turn into rain within an hour. Do not lock yourself into a rigid plan. If the morning is rainy at BOH, drive to the mossy forest instead. The canopy there provides some cover, and the rain adds mood to the forest shots.
Keep your gear in a dry bag between locations. Change lenses inside the bag or in your car. Humidity is the biggest threat to your sensor and lens elements.
Your Next Step
Cameron Highlands is not a destination you conquer in one trip. It rewards patience and repeated visits. If you can only go once, focus on the three locations listed here. Shoot the mist. Compress the terraces. Let the fog do the work.
Pack your gear, book your accommodation in Tanah Rata, and set that early alarm. The images you bring back will remind you why you picked up a camera in the first place.
For more location ideas across the region, read our feature on 7 underrated national parks in Asia for epic landscape photography.