The Himalayas are arguably the most demanding landscape photography environment on Earth. Thin air, brutal cold, and unpredictable weather test every piece of gear you carry. I have seen photographers arrive at Everest Base Camp with gear that simply stops working. Batteries die in hours. LCD screens freeze over. Tripod legs lock up. This guide is built around one question: what gear actually survives and performs in the Himalayas? If you are planning a photography trip to these mountains in 2026, the choices you make before you leave will determine whether you come home with wall worthy images or expensive lessons.
Packing the right gear for Himalayan landscape photography means balancing weight, durability, and performance at altitude. You need a weather sealed camera body with reliable autofocus, lenses that cover wide to telephoto ranges, a carbon fiber tripod that handles strong wind, and a power strategy that accounts for extreme cold. This guide breaks down each category with specific 2026 recommendations for amateur and semi professional photographers heading into the high Himalayas of Nepal and Tibet.
What Makes the Himalayas So Hard on Camera Gear
High altitude photography is not like shooting in Yosemite or the Scottish Highlands. At 15,000 feet, the air holds less oxygen, which means your gear runs hotter and batteries drain faster. UV radiation is more intense, and temperature swings of 50 degrees Fahrenheit between day and night are normal. Add in dust from dry trails, snow glare, and the occasional monsoon shower, and you start to understand why standard gear fails.
The biggest mistake I see is photographers treating a Himalayan trip like any other mountain shoot. They bring the same bag they use for weekend hikes. That approach leads to broken equipment and missed shots. You need a system where every component earns its weight.
Choosing a Camera Body for High Altitude
Your camera body is the foundation of your kit. It needs to handle cold, moisture, and dust without complaint. Here are the features that matter most when your life depends on gear reliability at 18,000 feet.
- Full weather sealing: Look for magnesium alloy bodies with gaskets around every port and button. A camera without proper sealing will let in dust and moisture, and both are abundant in the Himalayas.
- Large battery capacity: The Nikon Z8 and Sony A7R V use newer batteries that hold charge longer in cold. Avoid older bodies that need battery changes every 200 shots.
- High resolution sensor: 45 megapixels or more gives you room to crop and reframe. The Himalayas are vast, and you cannot always get the perfect composition in camera.
- Good autofocus in low light: Sunrise and sunset are the best times to shoot, but light is dim at altitude. Phase detect autofocus with good low light sensitivity makes a real difference.
- Built in intervalometer: For time lapses and star trails. You do not want to rely on an external device that can fail or freeze.
Bodies like the Canon EOS R5, Nikon Z8, and Sony A7R V are popular choices for 2026 expeditions. Each offers solid weather sealing and excellent image quality. If you are on a tighter budget, a used Nikon D850 remains a workhorse that handles altitude well. For more tailored advice, see our guide on choosing the perfect camera gear for capturing Asia's stunning landscapes.
Lenses That Bring the Himalayas Home
Lens choice determines what kind of images you bring back. Wide angle lenses capture the scale of the mountains. Telephoto lenses isolate peaks and compress distance. A balanced kit lets you shoot both the vast panorama and the intimate detail.
Here is a practical process for building a Himalayan lens kit.
-
Start with a wide angle zoom. A 16-35mm f/2.8 or f/4 is your primary landscape lens. The f/2.8 version helps with astrophotography, but the f/4 is lighter. For the Himalayas, weight matters, so consider the f/4 if you are carrying everything on your back.
-
Add a standard zoom for versatility. A 24-70mm f/2.8 or f/4 covers the most useful range for travel and environmental shots. This lens stays on your camera during the day. It handles village scenes, porters, and mid range mountain views.
-
Pack a telephoto for compression. A 70-200mm f/4 is ideal. The f/2.8 version is heavy, and the extra stop of light is less valuable at altitude where you shoot mostly in daylight. Use the telephoto to pull distant peaks closer and create layered compositions.
-
Consider a prime for low light. A 35mm f/1.4 or 50mm f/1.2 gives you a stop or two of extra light for pre dawn shoots and night photography. This is optional but adds creative flexibility.
A common question is whether to bring a 100-400mm zoom instead of the 70-200mm. The longer reach is nice, but the weight penalty is significant. Most photographers find the 70-200mm gives enough reach for landscape work. If you plan to shoot wildlife like snow leopards or blue sheep, the 100-400mm becomes more valuable. For more on working with mountain scenes, read our top tips for capturing vibrant mountain landscapes in Asia's remote regions.
Tripod Stability Above the Tree Line
Tripods behave differently at altitude. The wind is stronger, the ground is less stable, and your fingers are too cold to fuss with finicky locks.
A carbon fiber tripod is mandatory. It is lighter, dampens vibration better than aluminum, and does not get painfully cold to touch. Look for a model that can support your heaviest lens and body combination. The peak design travel tripod or the Gitzo Mountaineer series are solid choices for 2026.
Avoid center columns that add weight and reduce stability. Leg sections with twist locks are easier to operate with gloves than flip locks. Spike feet help on ice and loose scree. Bring a set of rubber feet for stone floors and teahouse rooftops.
Your tripod head matters too. A ball head with an Arca Swiss compatible plate is the standard choice. Make sure the head has enough friction to hold your gear steady in wind. If you shoot a lot of panoramic stitches, a leveling base can save time during post processing.
Using Filters in Thin Air
Filters are as important in the Himalayas as anywhere else, but the conditions demand specific choices.
| Technique | Common Mistake | Why It Matters at Altitude |
|---|---|---|
| Using graduated ND filters for high contrast scenes | Using resin filters that warp or scratch | Cold makes resin brittle. Glass filters resist cracking and maintain optical quality. |
| Applying a polarizer to cut glare on snow and water | Leaving the polarizer on for wide panoramas | Polarizers darken the sky unevenly at wide angles. Remove it for stitched panoramas. |
| Using a solid ND filter for long exposures | Forgetting to remove the filter cap | At altitude, checking the viewfinder is slow. Develop a system so you do not waste time. |
| Cleaning filters before every shoot | Touching the glass with dirty gloves | Dust and grit are everywhere. Use a blower first, then a microfiber cloth. |
A 100mm square filter system is versatile, but magnetic round filters are faster to use with cold hands. Choose one system and stick with it. Carrying both adds weight and confusion.
Power Management When It Is 20 Below
Battery life is the single biggest practical challenge of Himalayan photography. Lithium ion batteries lose capacity in the cold. A battery that lasts 500 shots at sea level might give you 150 shots at 15,000 feet in winter.
Carry at least four batteries. Keep them inside your jacket, close to your body. Rotate batteries so that one is always warm. When a battery dies, put it in an inner pocket, not back in the bag. It will recover some charge as it warms up.
A solar panel can work for longer treks. The Anker PowerPort Solar 21W is lightweight and packs small. Pair it with a power bank that charges via USB C. Most modern cameras can charge in camera from a power bank, which is a backup strategy worth testing before you leave.
For night photography, batteries drain even faster. If you plan to shoot star trails or the Milky Way, bring extra batteries and keep them warm. Our guide on essential techniques for capturing stunning nightscape landscapes across Asia covers this in more detail.
Expert advice: "I tape hand warmers to my camera body when shooting aurora or night shots above 12,000 feet. A single hand warmer wrapped around the battery grip adds 30 to 45 minutes of shooting time. Just make sure it does not block the ventilation ports."
* Tenzing Dorjee, expedition photographer based in Kathmandu
Protecting Your Gear from the Elements
The Himalayas are dusty. Dry trails, wind, and yak trains kick up fine dust that gets into every crevice. Camera sensors and lens mounts are vulnerable.
Use a rain cover even when it is not raining. A lightweight cover like the Think Tank Hydrophobia or a simple Op/Tech rainsleeve keeps dust off. Change lenses sparingly and always face the camera body away from the wind.
Condensation is another hidden problem. Moving from a cold exterior to a warm teahouse causes moisture to form on and inside your gear. Seal your camera in a zip lock bag before going indoors. Let it warm up slowly for an hour before opening the bag. This prevents internal fogging and mold growth.
Carry a small blower, a microfiber cloth, and a sensor cleaning kit. Use the blower on every lens change. Check your sensor every few days. Dust spots that seem minor on the LCD become glaring in post processing.
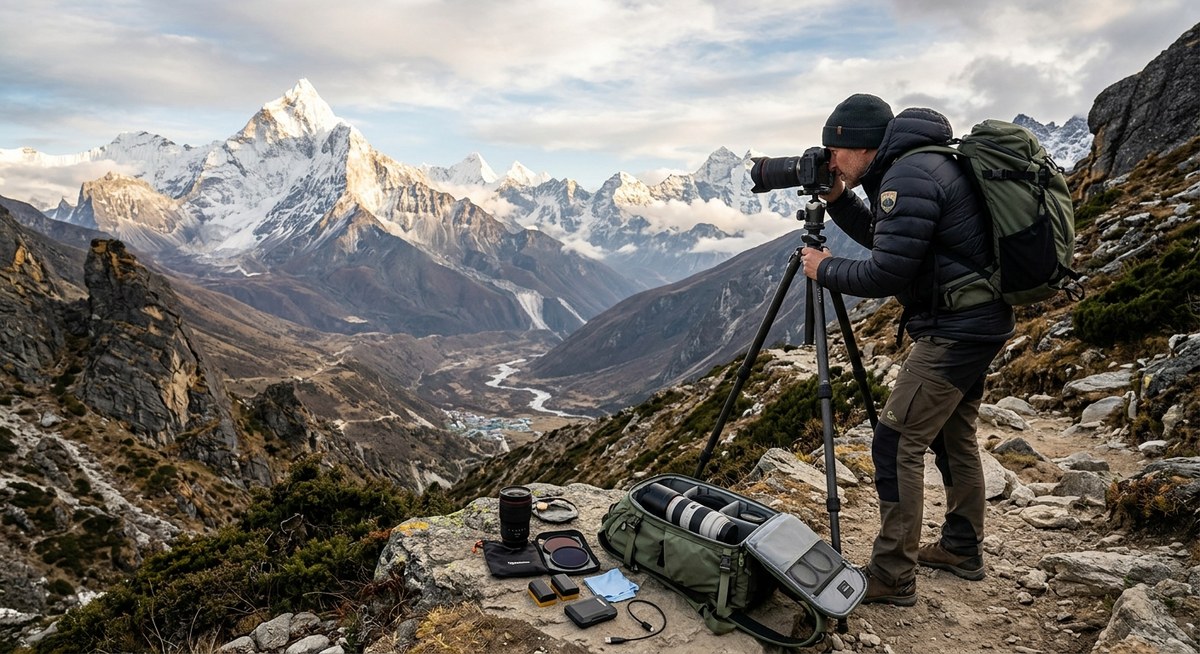
Carrying It All Without Breaking Your Back
Pack weight is a serious concern in the Himalayas. You might walk eight to twelve hours a day at altitude. Every pound matters.
A 40 to 50 liter backpack is usually enough for a week long trek with photo gear. The F Stop Tilopa and Shimoda Explore series are popular because they have dedicated camera inserts that protect gear while keeping the pack balanced. Look for a pack with a hip belt that transfers weight to your hips, not your shoulders.
Inside the pack, distribute weight evenly. Put heavy items like the tripod and extra batteries near the center of your back. Lighter items like filters and snacks go on top. A waist belt with pockets gives you access to batteries and memory cards without taking off the pack.
If you hire a porter, keep your camera, one lens, and essential batteries on your person at all times. Porters are reliable, but bags get separated or delayed. Your camera should never leave your sight.
Final Word on Himalayan Gear
Good gear does not guarantee great photos, but bad gear guarantees frustration. The Himalayas are not a place to discover that your tripod cannot handle wind or that your camera freezes after five minutes. Test every piece of equipment before you leave. Practice changing lenses with gloves on. Charge and discharge your batteries to know their real capacity.
When you are standing at Kala Patthar watching the sun hit Everest, you want to be thinking about composition and light, not your camera. The right gear fades into the background. It becomes an extension of your hands. That is the goal.
Take this list, build your kit, and get out there. The mountains are waiting, and 2026 is your year to bring back images that do justice to the roof of the world.