The marble walls of Taroko Gorge rise hundreds of feet into a sky that often looks more like a watercolor wash than a solid blue. Mist pours through the canyon like slow motion smoke, and the Liwu River churns far below. If you have ever stood at the Tunnel of Nine Turns and watched the fog wrap around ancient rock, you know why photographers return here year after year. Capturing that atmosphere requires more than just pointing a camera. It demands a plan for the mist itself.
To photograph Taroko Gorge’s misty mountains in 2026, plan your visit for late spring or early autumn when thermal contrast creates regular fog. Use a telephoto or mid-zoom lens to compress layers, shoot with a narrow aperture, and bracket exposures for the dim light. Prioritize weather sealed gear and a tripod. Post processing should enhance, not replace, the natural depth of the haze.
Why Taroko’s Mist Is Different from Any Other Mountain Fog
Most mountain ranges produce mist when warm air hits cold peaks. Taroko Gorge adds a twist. The narrow canyon traps moisture from the Pacific, and the marble walls radiate heat differently than granite or basalt. That creates a fog that sits in distinct layers. You can see three or four bands of haze at different altitudes, each with its own density. Your job is to separate and emphasize those layers, not flatten them into a white wall.
This unique behavior is what makes Taroko photography tips so different from general landscape advice. Standard wide angle shots can look flat here. The mist eats detail. You need to work with the fog, not against it.
Best Windows of Light for Misty Mountain Shots
Timing matters more than gear in Taroko. Based on conditions in 2026, here are the prime windows:
- May through June and September through October offer the most reliable morning fog. Summer rains saturate the air, then overnight cooling produces steam like effects.
- 7:00 AM to 9:00 AM is the golden pocket for misty light. The sun is low enough to side light the canyon but high enough to pierce the thinner fog.
- After a typhoon (follow safety advisories) the gorge can fill with dramatic, fast moving clouds. These windows are unpredictable but produce the most ethereal images.
Avoid midday unless you want harsh contrast between bright mist and dark rock. And skip December through February when the fog tends to be flat gray rather than layered white.
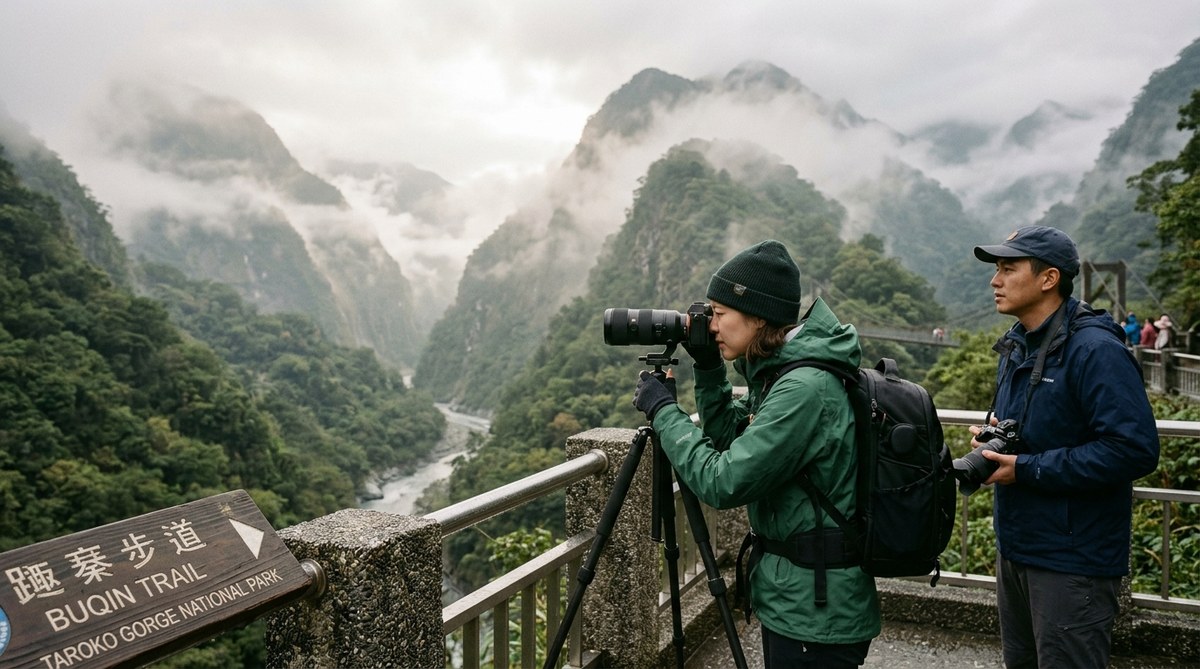
Gear That Survives the Spray and the Silt
Taroko is wet. Water drips from the cliff faces. Spray from the river rises into the trail. Your camera will get damp. Start with a weather sealed body and a lens that can take a light rain. A lens hood is mandatory for keeping droplets off the front element.
For focal length, take one mid zoom like a 24 70mm and one short telephoto like a 70 200mm. The telephoto is critical. It compresses the distant layers of mist and rock, creating a painting like effect that wide angles cannot match. A polarizing filter helps cut glare off wet marble, but be careful with it in very low light. A circular neutral density filter (3 stop) lets you use a wider aperture if you want to soften the mist even more.
If you want to see how other photographers handle gear in extreme Asian environments, check out this guide on choosing the perfect camera gear for capturing Asia’s stunning landscapes.
Camera Settings That Tame the Fog
Mist fools your metering system. The camera sees bright white and underexposes the rock. You need to compensate. Here are the baseline settings I use in Taroko:
| Setting | Recommendation | Why |
|---|---|---|
| Exposure mode | Manual or Aperture Priority with +0.7 to +1.3 EV | Keeps mist white, not gray. Bracket 3 shots for safety. |
| Aperture | f/8 to f/11 | Enough depth of field for foreground and background. Wider apertures (f/4) can work if you want selective focus on one layer. |
| ISO | 100 to 400 | Low noise is important for the smooth gradients in mist. |
| White balance | Daylight or 5500K | Auto white balance can add warmth and ruin the cool tonal quality of the fog. |
| Focus | Manual, set to 1/3 into the scene | Autofocus may hunt on mist. Pre focus on a rock face at mid distance. |
Shutter speed depends on light. On a bright morning you might shoot 1/60 at f/8. In deeper fog, 1/15 or longer. Always use a tripod for anything below 1/30.
How to Compose with Layers of Mist
The classic Taroko composition uses three layers: a dark foreground rock or tree, a mid layer of mist, and a distant peak or cliff. Your job is to arrange those elements.
- Place your darkest element in the foreground. That gives the eye an anchor.
- Leave the mid layer mostly soft haze. Do not try to sharpen it in camera.
- Let the distant peak be a faint silhouette. Overexpose it slightly to separate it from the sky.
Leading lines work well too. The river itself curves through the gorge. Include a small section of water in your frame to guide the viewer through the mist. And do not be afraid of negative space. Sometimes the best Taroko image is 70 percent fog with only a hint of marble.
A Step by Step Process for Capturing a Misty Mountain Scene
Here is the workflow I follow at a spot like the Swallow Grotto trail.
- Arrive 30 minutes before sunrise. Find a composition that includes at least two distinct rock faces and a slice of sky. Lock down your tripod.
- Set your lens to 70mm or longer. Zoom in to isolate a small section of the canyon. Do not try to capture the entire gorge in one shot.
- Take a test shot at f/8, ISO 200, and check the histogram. If the mist is pure white without detail, add +1 stop of exposure compensation. If the rock is clipping, back off.
- Bracket five shots at 1 stop intervals. This gives you options later. The mist may look perfect in one exposure while the rock is better in another.
- Wait for wind or a subtle change. The mist shifts rapidly. When you see a new layer slide across the marble, fire the shutter again. Repeat for 20 minutes.
That short window often produces the most memorable frames.
Common Mistakes Even Experienced Photographers Make
Mist is deceptive. You think you have it, then you get home and find a flat white mess. This table shows the most frequent errors and the fix.
| Mistake | Why It Happens | How to Fix |
|---|---|---|
| Blown out mist | Overexposure to make mist bright | Bracket and use ETTR (expose to the right, but watch highlights). |
| No depth in fog | Wide angle lens and too much sky | Switch to telephoto, include a dark foreground element. |
| Soft focus across entire frame | Autofocus locking on mist | Use manual focus and hyperfocal distance practice. |
| Flat color | Auto white balance adds yellow | Set white balance to daylight and adjust in post. |
| Camera shake | Shutter too slow, no remote release | Use a tripod, remote shutter, or 2 second timer. |
“The biggest mistake I see is people trying to expose the mist like snow. It is not snow. Mist is translucent. You have to let it glow, not turn it into a white card.” – Hualien based landscape photographer Lin Mei, who shoots Taroko nearly every week.
Post Processing That Preserves the Atmosphere
Do not overcook a misty shot. The goal is to keep the fog looking natural while giving the rock more structure. Use these techniques:
- Global contrast with a slight S curve. Pull down the shadows a touch, raise the midtones, and keep the highlights soft.
- Selective clarity on the rock only. Paint a mask over the marble and add 10 to 20 points of clarity. Leave the mist at zero clarity.
- Cool the white balance slightly. Mist looks blue in real life. A tiny shift toward blue (around 4800K) feels authentic.
- Remove dust spots and nothing else. Do not clone out the mist wisps. They are the story.
- Sharpen only the foreground layer using a low pass mask. The mist must stay soft.
For deeper editing techniques suited to Asian landscapes, look at mastering Asian landscape photography edits for stunning results.
When the Mist Doesn’t Show Up
Some mornings you get blue sky and clean marble. That is still worth photographing, but treat it differently. Use a polarizer to darken the sky and emphasize the rock textures. Shoot early for long shadows. The gorge without mist is dramatic in a different way, and you can always return another day for the fog.
One Last Look Through the Viewfinder
Taroko Gorge in 2026 is still one of the most rewarding places on Earth to practice misty mountain photography. The fog does the creative work for you, if you let it. Pack your gear the night before. Set your alarm for 5:00 AM. And when you are standing on that marble bridge with the vapor rising around you, remember that the best images are the ones where you feel the mist as much as you see it. Trust your settings. Shoot the layers. Come home with the kind of photographs that make you want to go back.