The Arashiyama Bamboo Grove has a reputation that reaches far beyond Japan. You have seen the photos: impossibly tall stalks leaning into a canopy of green, sunlight filtering through in soft rays, a single figure walking into the distance. That shot looks simple, but pulling it off in reality takes planning, patience, and a few tricks that most visitors never learn. The grove is one of the most photographed places in Kyoto, yet many travelers leave with nothing but crowded pathways and blown out highlights. With the right approach, you can bring home images that truly capture the quiet magic of the bamboo.
To photograph Kyoto’s bamboo forests successfully, you must arrive before sunrise, use a wide lens with a small aperture for depth, and incorporate leading lines from the stalks. Avoid midday crowds and harsh light by shooting at dawn or on overcast days. Practice patience and wait for moments without other visitors in your frame.
When the Bamboo Grove Comes Alive: Timing Your Visit
The single biggest factor in your bamboo photography success is not your camera. It is the time you choose to walk those paths. Arashiyama Bamboo Grove opens to the public 24 hours a day, but the adjacent Tenryu ji Temple grounds have set hours. The public path is where you will get the classic shot, and it is also where the crowds gather from about 8 a.m. onward.
Dawn is your friend. Arrive at least 30 minutes before sunrise. In spring and summer that means a very early wake up call, but the reward is a grove that is nearly empty. During the first hour of daylight, the low angle of the sun casts long shadows and creates a warm glow that makes the green pop. You can set up your tripod without worrying about people walking into every frame.
Overcast days are secret weapons. Direct sunlight can create harsh contrast between the bright sky and the dark understory of the bamboo. A soft, overcast sky acts like a giant diffuser, giving you even light that reveals the texture of the bamboo bark and the subtle gradients of green. Do not wait for a blue sky. Cloudy mornings often produce the best results.
Off season matters too. November is famous for autumn colors in Kyoto, but the bamboo grove stays green year round. Visiting in late winter (February) or early spring (March) means fewer tourists overall. You can also shoot in light rain. Rain saturates the green and adds a reflective sheen to the leaves. Just protect your gear with a rain cover or umbrella.
The Gear You Actually Need for Shooting in Tight, Green Spaces
You do not need a bag full of expensive primes to get great bamboo shots. The grove is a tight corridor. Stalks are close together, and the path is narrow. A versatile setup works best.
| Gear Type | Best Choice for Bamboo Forests | Common Mistake |
|---|---|---|
| Lens | Wide angle zoom (16-35mm or 24mm equivalent) | Using a telephoto, which compresses the already narrow path and makes it feel claustrophobic |
| Tripod | Lightweight carbon fiber with a ball head | Leaving it behind “to save weight” and then struggling with blurry long exposures |
| Filter | Circular polarizer | Using a variable ND filter that creates vignetting or color cast in the green tones |
| Camera body | Full frame or APS C with good high ISO performance | Relying on smartphone cameras for the deep depth of field shots (though phones can work if you use manual mode) |
Why the polarizer matters: Bamboo leaves are waxy and often reflect light in a way that desaturates the green. A circular polarizer cuts that reflection, making the green richer and more saturated. It also helps darken the sky if it peeks through the canopy, adding drama to your composition.
Tripod tip: Even if you plan to shoot handheld at high shutter speeds, a tripod gives you the ability to take long exposure shots of people moving through the grove. If you set a 2 second exposure on a quiet morning, passing visitors will blur into ghostly streaks, which can add a sense of motion and solitude.
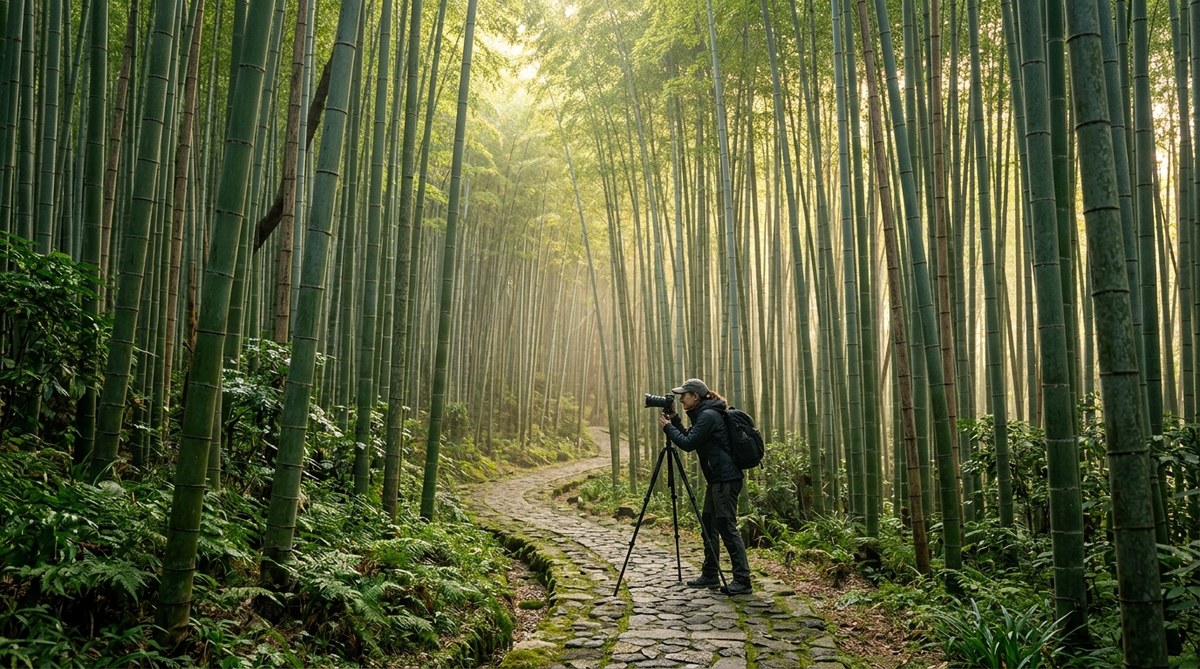
Composing the Chaos: Techniques for Stronger Frames
The bamboo grove is a natural grid of vertical lines. Your job is to use those lines to guide the viewer’s eye. Many photographers simply stand in the middle of the path and shoot straight ahead. That works, but it rarely delivers an image that stands out. Try these composition techniques instead.
-
Find a single converging point. Look for a spot where two rows of bamboo lean inward, forming a natural tunnel. Position yourself so that the lines lead to a vanishing point near the center of the frame. Crouch low to emphasize the convergence. A wide angle lens exaggerates the perspective.
-
Include a human element for scale. The bamboo stalks can look thin and unimpressive without something to show their size. Have a friend walk about 30 feet ahead, wearing a neutral or red colored coat. The red adds a strong focal point against the green. Instruct them to walk slowly and look up, not at the camera. This gives a natural, candid feel.
-
Shoot up, shoot down, shoot sideways. Do not keep your camera at eye level. Point it straight up to capture the canopy merging into a circular pattern. Point it down at the pathway to see the fallen leaves and the base of the stalks. Use a low angle to make the bamboo appear even taller. Each new angle gives a different story.
-
Use negative space. Sometimes the most powerful image is a single stalk with a lot of empty background. Frame a single bamboo column against a soft, out of focus background of other stalks. This isolates the texture and the small details like the nodes and the slight curve of the stem.
Expert advice from a Kyoto based photographer I spoke with in 2026: “Don’t try to capture the entire grove in one shot. That’s what everyone else does and it always looks like a snapshot. Look for the small compositions. A single bent stalk, a ray of light hitting a patch of moss, a gardener sweeping the path. Those are the images that tell the real story of place.”
Beyond the Main Path: Hidden Bamboo Spots in Kyoto
The Arashiyama grove is iconic, but it is also the most crowded. If you want variety in your bamboo photographs, venture a little further. These locations offer quieter scenes with different light and atmosphere.
-
Okochi Sanso Garden: Just a few minutes walk from the main grove, this villa garden has a beautiful bamboo path that is shorter but far less visited. The garden charges a small entry fee (1,000 yen in 2026), which includes a matcha tea ticket. The bamboo here is pruned meticulously, and the path winds uphill, giving you different perspectives. Morning light streams through the east facing slope.
-
Kodaiji Temple: Located in eastern Kyoto near the city center, Kodaiji has a small bamboo grove in its temple grounds. It is not as tall as Arashiyama but it is often empty. The light there is filtered through maple leaves in autumn, mixing green and orange. In winter, the bare branches add texture.
-
Nison-in Temple: North of Arashiyama, this temple features a long approach lined with moss and maple trees, and a smaller bamboo segment near the back. It is a fantastic spot for intimate, close up shots of bamboo with moss covered stone lanterns.
Each of these locations lets you practice the same techniques without the pressure of crowds. If you are staying in Kyoto for more than a day, plan one morning at Arashiyama and one at a quieter spot. The variety will strengthen your portfolio and your editing workflow.
Editing for the Green: Getting Colors Right
Bamboo green is a tricky color. It is not the bright green of spring leaves. It is a muted, yellowish green with brown undertones. Many edits swing too far into saturation, making the grove look fake or cartoonish.
The right approach: Start by adjusting the white balance. Bamboo often reads as too warm under the canopy. Cool the image down slightly, moving the temperature slider toward the blue side by 200-300 Kelvin. Then boost the greens by adjusting the hue toward yellow a touch. Use the saturation slider selectively. Lower the yellow saturation and increase the green saturation moderately. This keeps the color natural.
Luminance matters: The shadow areas in the bamboo grove can be very dark. Lift the shadows in your raw editor, but do not clip the blacks. A small amount of black gives the image depth. Add a subtle vignette to keep focus on the center of the frame. If you used a polarizer, the green will already look richer. Do not overprocess.
For a full workflow on editing Asian landscapes, check out our guide on mastering asian landscape photography edits for stunning results. It covers color correction specific to lush vegetation.
Planning Your Shoot from Start to Print
To wrap up, here is a numbered list of practical steps you can follow before you even leave your hotel in Kyoto.
-
Check the weather and sunrise time the night before. Use a weather app that shows cloud cover percentage. Aim for at least 60% cloud cover. Sunrise in Kyoto in June is around 4:45 a.m. In December it is around 6:50 a.m. Set your alarm accordingly and allow 30 minutes to travel from central Kyoto to Arashiyama by taxi or the first train.
-
Pack your bag the night before. Include a wide angle lens, a polarizer, a tripod (carbon fiber if you have it), a rain cover, and a small towel to wipe condensation. Bring a headlamp, because the grove is very dark before sunrise.
-
Walk the path twice. On your first pass, just look. Do not shoot yet. Identify the spots where the light hits, where the stalks create patterns, and where the path curves. On the second pass, set up your tripod and wait for a gap in foot traffic or for a person to walk into the ideal spot.
-
Shoot in raw. This is nonnegotiable. The green tones in bamboo need the flexibility of a raw file. JPEG compression will ruin the subtle gradients. Use raw even if you plan to edit on your phone later. Many editing apps now handle raw files from most cameras.
-
Take a break. After 45 minutes, step away from the viewfinder. Sit on a bench near the river. Let your eyes relax. Then go back and look at your images on the camera screen. Ask yourself: Does this photo feel quiet? Does it show the atmosphere? If not, try again with a different focal length or a tighter crop.
Composing the Final Image
Think about your series. If you are building a set of bamboo photographs for a blog post, a portfolio, or a social media carousel, create variety. One shot of the grand tunnel. One shot of a detail (a leaf, a broken stalk, a shaft of light). One shot with a person for scale. One shot looking straight up. This variety keeps viewers engaged and shows that you understand more than just the “postcard” angle.
For broader landscape inspiration, our article on mastering the art of golden hour landscape photography in asia offers timing and exposure techniques that apply directly to bamboo grove mornings.
Your Best Bamboo Photos Are Waiting
Walking into Arashiyama Bamboo Grove before the crowds arrive is a rare experience. The air feels still. The stalks creak slightly as they sway. The light changes minute by minute. With the right timing and a few deliberate composition choices, you can capture images that reflect that peace. Do not rush. Do not chase the impossible shot. Focus on the details, the light, the simple geometry of the bamboo. Those are the photos that will make you want to return year after year.