Komodo National Park is a landscape photographer's dream with a twist. You expect dragons, but the real surprise is the volcanic backbone that shapes every island. I remember standing on Padar Island as the sun rose, watching three crescent beaches unfold below me. The hills were covered in dry savannah grass, and the volcanic rock under my boots felt ancient. That moment taught me something: this park is not just about wildlife. It is about raw, volcanic geology meeting tropical seas. To truly photograph Komodo National Park, you need to understand its volcanic history and how light interacts with that terrain.
To photograph Komodo National Park successfully, focus on volcanic landforms like the hills of Padar and the red sand of Rinca. Shoot during the dry season (April to October) for clear skies. Use a telephoto lens for layered ridges and a wide lens for sweeping coastlines. Golden hour transforms the rusty volcanic soil into glowing oranges and reds. Always pack a polarizer to cut glare off the water and reveal coral reefs beneath.
Understanding the Volcanic Terrain
The park sits within the Sunda volcanic arc. Its islands emerged from ancient eruptions, leaving behind steep hills, jagged cliffs, and sandy beaches colored by mineral deposits. The most volcanic-looking spot is Padar Island. The hills here are bare, covered in grasses that turn golden in the dry season. Erosion has carved deep gullies into the slopes, creating leading lines that pull your eye toward the ocean.
Rinca Island offers a different volcanic palette. The ground is reddish, rich in iron oxide. You can see layers of volcanic ash in the cliffs near the ranger station. Komodo Island itself has a mix of dry forest and savannah, but the southern coast reveals black volcanic boulders and steep ravines.
These textures reward photographers who pay attention to detail. A wide lens captures the scale. A short telephoto compresses the hills, making them look stacked like a stage backdrop.
Best Times and Conditions to Photograph Komodo National Park
Timing matters more here than in many other locations. The dry season, from April to October, brings stable weather and fewer clouds. This is when you get sharp sunsets and clear views of the islands from the boat. Wet season (November to March) can produce dramatic storm clouds, but the humidity often makes the air hazy and the trails slippery.
The light changes fast. Early morning (5:30 to 7:00 AM) gives low, warm light that rakes across the hills, emphasizing every contour. Late afternoon (4:00 to 5:30 PM) does the same from the opposite direction. Midday light is harsh and flat; the volcanic soil can look washed out. I suggest planning your hikes to be at the viewpoint for sunrise or sunset.
Tides also affect your composition. Low tide exposes coral platforms and tidal pools that mirror the sky. High tide means water comes right up to the sand, perfect for foreground reflections.
Essential Gear for Volcanic Shots
You do not need a truckload of equipment, but a few specific items help.
- Wide-angle zoom (16-35mm or similar) for sweeping vistas and including foreground elements like volcanic rocks.
- Telephoto zoom (70-200mm or 100-400mm) for compressing distant hills or isolating a dragon against the landscape.
- Tripod for long exposures at sunrise/sunset and for stacking focus on macro details.
- Polarizing filter to cut glare from water and saturate the rusty soil.
- Graduated neutral density (GND) filter to balance bright sky with darker land.
- Weather-sealed camera body – volcanic dust gets everywhere, and salty sea spray is a constant threat.
Keep your gear in a dry bag while on the boat. The humidity is high, and the sea can splash unpredictably.
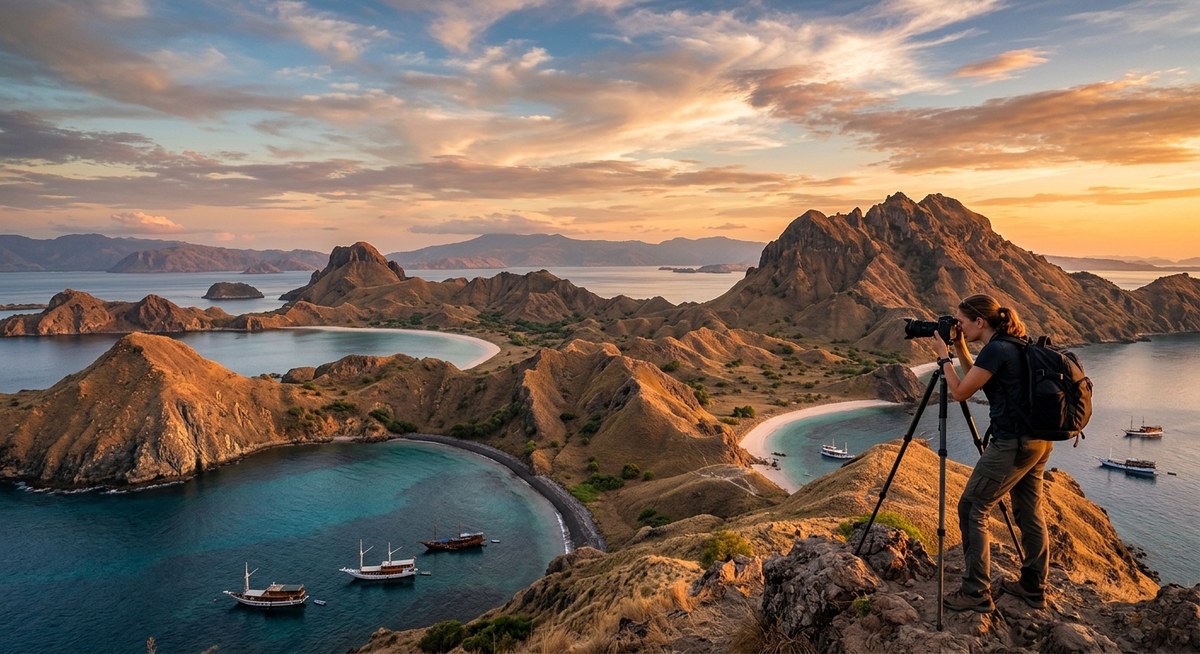
A Step-by-Step Process for a Morning Shoot on Padar Island
Padar Island is the signature sunrise location. Follow these steps to get the shot.
-
Start the hike 45 minutes before sunrise. The trail is about 500 meters but steep. Bring a headlamp and water. Your tripod will be your third leg on the loose gravel.
-
Reach the triple-bay viewpoint. Set up your camera aiming east toward the rising sun. Use a wide focal length around 16mm to include all three beaches and the sunburst.
-
Compose with a low horizon (one-third from bottom) so the sky dominates. Include a foreground rock or bush for depth.
-
Expose for the highlights (sky) using spot metering, or bracket three shots ( -2, 0, +2 EV) for HDR blending later.
-
Shoot continuously as the sun rises. The light changes by the minute. Capture the first rays hitting the hilltops.
-
Stay after the sun is fully up. The shadows sharpen, revealing texture in the hills. Switch to a telephoto to compress the layers of ridges behind the viewpoint.
-
Descend before the heat builds. The trail gets slippery from loose stones. Use a fast shutter speed if you want to capture a fellow hiker for scale.
Common Composition Mistakes and How to Fix Them
Here is a table of frequent errors photographers make when trying to photograph Komodo National Park's volcanic landscapes, along with practical fixes.
| Mistake | Why It Hurts the Image | How to Fix It |
|---|---|---|
| Centering the horizon | Makes the scene static, wastes potential drama | Use the rule of thirds; put the horizon on the top or bottom line |
| Shooting in midday sun | Volcanic soil looks flat and washed out | Only shoot during golden hours; use a tripod for slower shutter speeds |
| Ignoring the foreground | Lacks depth; viewer is confused about scale | Include a rock, branch, or patch of grass within 2 meters of the lens |
| Overexposing the sky | Blown highlights can never be recovered | Bracket exposures or use a GND filter |
| Not checking the tide | Waterline cuts through the composition awkwardly | Research tide charts; shoot at low tide for exposed tidal pools |
| Forgetting a polarizer | Glare from water and wet rocks reduces contrast | Rotate the polarizer until reflections vanish |
Expert advice from a local guide I met on Rinca: "The best light hits the dragon's habitat 15 minutes after sunrise. The heat makes them move to the shade, so you need to be set up before they start walking. Use a long lens and keep your distance. Their breath fogs the lens if you get too close."
Composing with Volcanic Elements
The volcanic landscape gives you strong lines. Look for ridges that lead toward the sea. On Padar, the main ridge line divides the island and slopes down to the water. Position yourself so that ridge becomes a diagonal line from one corner of the frame to the opposite corner.
On Rinca, find the layers of volcanic sediment in the cliffs. A vertical composition works well there. Use a small aperture (f/11 to f/16) to keep everything from foreground rock to background hills in focus.
On Komodo Island, the trail near the riverbed exposes black volcanic boulders. A low angle with a wide lens can make those rocks look massive. Include a dragon or a ranger for scale.
Managing the Tropical Light
The sun in the tropics rises and sets fast. You get maybe 20 minutes of truly golden light. During that window, the volcanic soil glows orange and red, especially after a rain. The water takes on a turquoise hue that contrasts beautifully with the warm land.
Shoot in RAW to retain maximum color information. Adjust white balance in post to slightly warm (5500K to 6000K) to enhance the earthy tones. Watch out for blue shadows from the sky; you can warm them up with split toning.
If you want to capture the Milky Way, the best months are May through August when the core rises before dawn. The island of Padar has minimal light pollution. Set up on the eastern viewpoint around 3:00 AM with a fast wide lens (f/2.8 or faster). Use the 500 rule (500 divided by focal length) to avoid star trails, or use a tracker.
Putting It All Together for a Day Trip
Most visitors reach the park by liveaboard or a speedboat from Labuan Bajo. A typical day trip stops at three locations. Here is a bulleted itinerary for a photography-focused day:
- 5:00 AM – Arrive at Padar Island. Hike to the viewpoint. Shoot sunrise.
- 7:30 AM – Return to boat. Breakfast while moving to Komodo Island.
- 9:00 AM – Hike Komodo Island's southern trail. Focus on dragons in the volcanic savannah.
- 11:00 AM – Snorkel at Pink Beach (the sand is stained red by volcanic foraminifera). Use an underwater housing or a drone to capture the color contrast.
- 1:00 PM – Lunch on the boat.
- 3:00 PM – Visit Rinca Island for afternoon light. Shoot the reddish hills and dragons near the ranger station.
- 5:00 PM – Head back to Labuan Bajo. Capture the sunset over the volcanic islands from the boat.
This schedule uses the best light for each location. It also avoids the midday heat when wildlife hides.
Staying Safe While Photographing
The volcanic terrain can be sharp and unstable. Wear sturdy shoes with good grip. The sun is intense; cover up and use sunscreen. Stay hydrated. When shooting near dragons, keep at least 5 meters distance. Do not crouch down near them; they may mistake you for prey.
Salt water and volcanic dust are a bad mix for camera gear. Change lenses inside a bag or with your back to the wind. Wipe your camera with a slightly damp microfiber cloth at the end of each day.
Final Thoughts on Photographing This Volcanic Wonder
Capturing the volcanic landscapes of Komodo National Park is about patience and respect for the land. The islands have been shaped by fire and time. Your job is to show that character through your lens. The best images come when you slow down, study the light, and let the geology guide your composition.
I hope these tips help you bring home images that do justice to this incredible place. Whether you are shooting with a smartphone or a full frame, the same principles apply: look for lines, use the golden hours, and always include something in the foreground. The park will give you the rest. Now pack your camera and go chase that volcanic light.