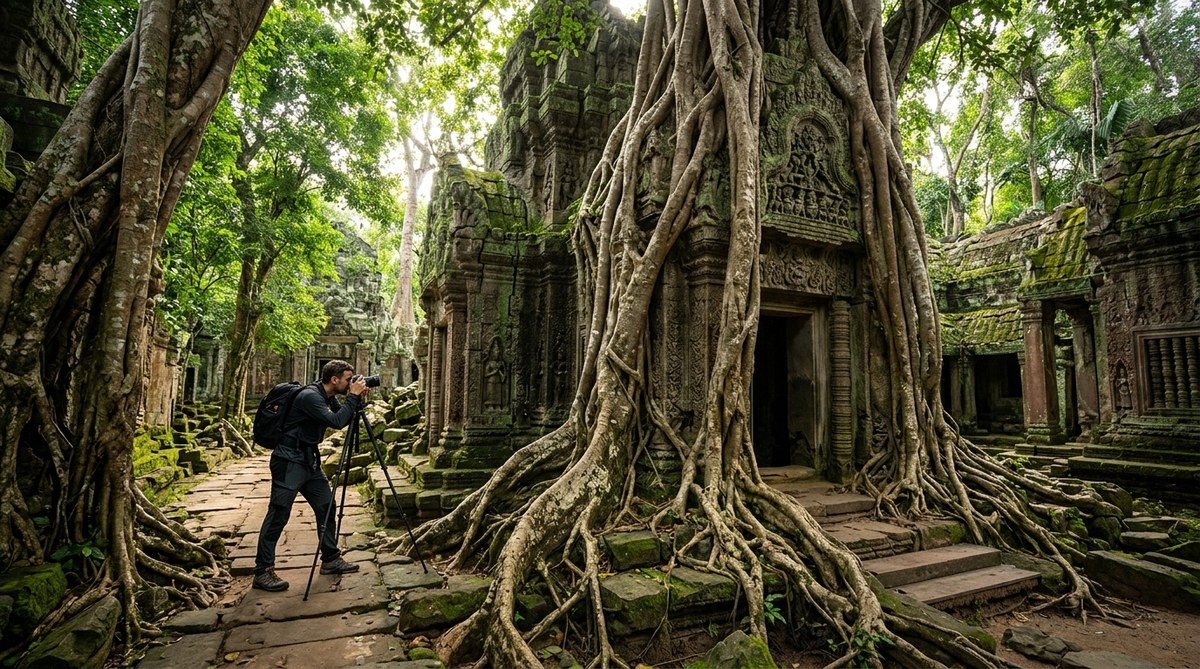
The air in the Cambodian forest feels heavy, humid, and alive. Sunlight filters through a canopy so dense it turns midday into a soft, green twilight. Then you see it: a banyan tree. Its roots don’t just grip the ground; they flow down the walls of an ancient temple like rivers of wood frozen in time. For a travel photographer, this is one of the most rewarding subjects on the planet. But capturing that feeling of ancient power is tough. The light is tricky. The contrast is brutal. And the scale is hard to translate into a flat image. This guide breaks down exactly how to handle those challenges. We will focus on the specific techniques you need for photographing banyan trees Cambodia in 2026.
Success with banyan tree photography in Cambodia depends on mastering three things: controlling harsh contrast with exposure bracketing, using a wide lens to show scale while including a human figure, and returning during the golden hours or misty mornings for soft, dramatic light. Avoid midday flat light and never forget a polarizer to cut glare on wet leaves.
Why Banyan Trees Demand a Different Approach
Most landscapes let you step back and frame the whole scene. Banyan forests do not. You are inside the subject. The tree is not a single object; it is a network of trunks, aerial roots, and stone ruins woven together. Standard landscape rules can fall apart here.
The biggest mistake photographers make when photographing banyan trees Cambodia is treating them like a typical forest. They try to fit everything into one wide shot. The result is a chaotic mess of branches with no clear focal point. You need a strategy before you press the shutter.
The 5 Step Field Workflow for Banyan Forests
Follow this process when you arrive at a location like Ta Prohm or Beng Mealea. It will save you time and help you see the image before you take it.
- Walk the perimeter first. Do not take out your camera yet. Walk around the entire structure. Look for the main root systems and how they interact with the stone. Find the one spot where the light breaks through the canopy.
- Identify your hero element. Choose one thing: a single massive root, a doorway swallowed by the trunk, or a patch of moss with great texture. Build your composition around that.
- Lock in your base exposure for the shadows. Meter for the darkest part of the scene where you want detail. This is usually the mossy stone or the inner trunk. The highlights will blow out, but you will fix that later with bracketing.
- Capture a 3 shot bracket. Set your camera to shoot at -2, 0, and +2 EV. This is essential for the high contrast between the bright sky peeking through leaves and the dark temple interiors.
- Add a human element for scale. Ask a travel buddy or a local guide to stand near the base of the tree. Have them wear a bright color like red or orange. It provides a clear focal point and shows just how massive these trees really are.
Gear Choices That Make a Difference
Your gear list for this trip does not need to be huge, but a few specific items will save your images.
- Wide angle zoom (16-24mm or 14-24mm): This is your workhorse. You need it to capture the height and the surrounding root system from a close distance.
- Standard zoom (24-70mm): Useful for isolating details, like the texture of the bark against a sandstone wall.
- Telephoto (70-200mm): Do not leave this at home. Use it for compression. A 200mm shot can stack layers of roots and ruins together, creating a flat, graphic look that feels abstract.
- Tripod: Non-negotiable. You will be shooting at low ISO for maximum dynamic range, and you need it for your bracketed shots.
- Circular Polarizer: This is the single most important filter for photographing banyan trees Cambodia. It cuts the harsh glare off wet leaves and damp stone, saturating the greens and browns.
Common Mistakes vs. Pro Techniques
Here is a table that outlines the most frequent errors and how to fix them.
| Mistake | Why It Fails | Pro Technique |
|---|---|---|
| Shooting at midday | Flat, harsh light. No texture in the roots or ruins. | Shoot during the first hour after sunrise or the last two hours before sunset. |
| Using only wide angle | The tree looks small and lost in the frame. | Mix in telephoto shots to compress the roots against the temple walls. |
| Ignoring the sky | Overexposed sky patches distract the eye. | Bracket your exposures or use a graduated ND filter to balance the sky. |
| Forgetting a subject | The image has no point of interest. | Include a person, a doorway, or a single beam of light as your anchor. |
| Leaving the polarizer in the bag | Washed out colors and glare on wet surfaces. | Rotate the polarizer to darken the greens and reveal the texture of the stone. |
Timing Your Visit for the Best Light
Cambodia has two main seasons. The dry season runs from November to April. The wet season runs from May to October. Both have advantages for the banyan forests.
- Dry season (November to February): This is the peak tourist season. The skies are clear, and the light is sharp. Arrive at the temple gates before they open at 7:30 AM. You will have about 90 minutes of soft, directional light before the sun gets harsh. This is the best time for photographing the contrast between the golden light and the dark green moss.
- Wet season (June to September): This is the secret for serious photographers. The air is humid and hazy. The forest floor is damp. You get mist in the mornings. The light is softer and more diffused. The moss and leaves look their richest green. A polarizer is a must here to fight the glare, but the mood you can capture is unmatched.
“The best shot I ever got at Ta Prohm was during a light rain in August. The mist softened the background, and the wet roots turned almost black against the green stone. I used a polarizer and a 70-200mm lens to isolate one root that looked like it was holding up the roof.” – Sopheak N., Siem Reap based photographer
How to Compose Around the Roots
Banyan roots create natural leading lines. Your job is to find them.
Look for roots that curve. A straight root is just a line. A curved root that wraps around a corner or a carving creates tension and movement. Use the rule of thirds. Place the curve of the root so it enters the frame from the bottom left and exits near the top right. This guides the viewer’s eye through the entire image.
Another strong composition is the frame within a frame. Find a gap between two roots. Shoot through that gap to show the temple structure behind it. This creates a sense of depth and discovery. It makes the viewer feel like they are peeking into a secret space.
For a more abstract approach, fill the frame entirely with the texture of the bark and the roots. Use a macro lens or a telephoto zoom. Focus on the patterns of the aerial roots as they descend. This works well on overcast days when you do not have dramatic shadows to work with.
Post Processing for the Cambodian Forest
Your raw files from these forests will look flat and green. That is normal. The goal in post is to bring out the contrast between the warm stone and the cool green moss.
- White balance: Do not use auto white balance. Set your Kelvin value manually. Start around 5000K and adjust. You want the stone to look slightly warm (orange/amber) while the moss stays a natural green. This color contrast is what makes the image pop.
- Tone curve: Lift the shadows a little to reveal detail in the roots and the dark corners. Pull the highlights down to recover any detail in the sky or the bright leaves. This creates a flat, matte look that works well for forest scenes.
- HSL adjustments: Go to the Green and Yellow sliders. Slightly desaturate the greens. Then shift the hue of the greens toward the yellow side. This removes the neon green look and gives the leaves a more natural, earthy tone.
- Clarity and texture: Use the Texture slider on the roots and the stone. Be careful with Clarity; too much will create halos around the branches. A light touch on Texture adds the tactile feel of the bark.
For a deeper look at processing workflow, check out our guide on mastering asian landscape photography edits for stunning results.
Planning Your Photo Trip for 2026
If you are planning a trip to Cambodia specifically for these forests, here are the locations you need on your list.
- Ta Prohm: The most famous. The “Tomb Raider” temple. It is crowded, but for a reason. The giant banyan and the silk-cotton trees are spectacular. Go at 7:00 AM and head straight to the inner sanctuary before the tour groups arrive.
- Ta Nei: A smaller temple right next to Ta Prohm. Almost no tourists. The banyan trees here have completely taken over. You can shoot for hours without a single person in your frame.
- Beng Mealea: A 2 hour drive from Siem Reap. This temple is a collapsed ruin, and the jungle has fully reclaimed it. The light is darker, and the atmosphere is more raw. Bring a flashlight and a tripod. This is the best spot for moody, low light shots.
- Preah Khan: Less famous than Ta Prohm but offers incredible root systems that grow directly over the walls. The light in the late afternoon is beautiful.
A Final Thought on Patience
Photographing banyan trees Cambodia is not about getting the shot in five minutes. It is about watching the light change. It is about waiting for a cloud to pass so the shadows soften. It is about coming back to the same tree at different times of day.
The best image of that ancient banyan might not be the one you took at sunrise. It might be the one you took at 4:30 PM when a beam of light hit a single root that had been in shadow all day. Give yourself that time. Sit with the tree. Let the scene speak to you. Then take the photo.