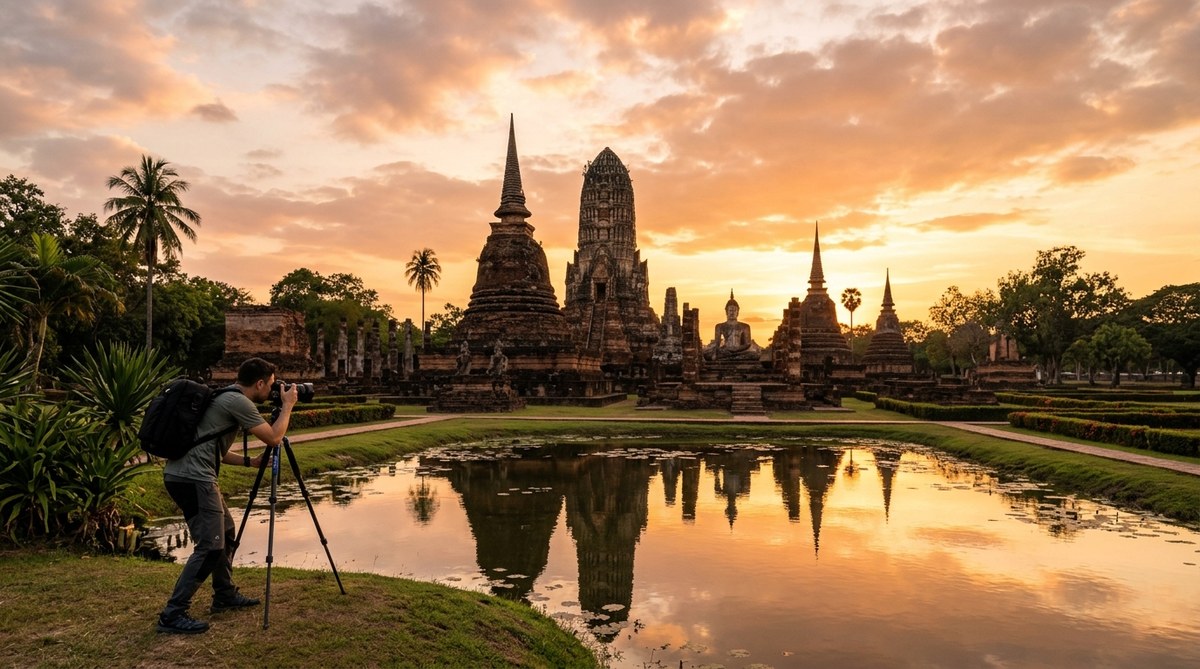
The sun sinks low over the Sukhothai ruins, and for about twenty minutes, the world turns to gold. The laterite bricks of a 700-year-old chedi glow from within. A single monk in saffron robes walks across the grass, and the low angle of the light catches every fold of fabric. This is the moment you came for. But capturing that golden light over Thailand’s ancient temple ruins takes more than just luck. It takes planning, the right technique, and a deep understanding of how the light moves through this part of the world.
To capture golden light at Thailand’s temple ruins in 2026, you need to arrive 45 minutes before sunrise or sunset, use a graduated neutral density filter to balance the bright sky with darker ruins, and shoot in RAW for maximum flexibility. Focus on the warm side of the ruin and include a human element for scale. The best months are November through February when the air is clearest and the light is most intense.
Why Thailand’s Temple Ruins Are a Golden Hour Dream
Thailand sits at a latitude where the sun’s angle during golden hour creates a unique effect. The light comes in low and warm, but it also bounces off the dry dust and humidity in the air. This scattering effect turns the sky into a gradient of amber and rose. When that light hits the weathered sandstone and laterite of ancient temples, the textures pop. Every carved Buddha face, every crumbling stairway, every lotus bud finial catches the light differently.
The ruins themselves act as natural reflectors. Unlike modern buildings with glass and steel, the porous stone of Ayutthaya’s temples or the brick of Phanom Rung absorbs the warm light and radiates it back softly. This gives your photos a glow that is hard to replicate anywhere else.
Timing Your Trip for 2026
Thailand has two distinct seasons that affect golden hour photography. The cool season from November to February offers the clearest skies and the lowest humidity. This is your window. The hot season from March to June brings haze. The rainy season from July to October brings dramatic clouds but also unpredictable downpours.
For 2026, plan your shoot between mid-November and mid-February. During this period, the sun sets further south in the sky, which means the golden light hits the southern faces of temple structures more directly. This is critical at sites like Wat Mahathat in Ayutthaya, where the famous Buddha head entwined in tree roots faces south.
Here is a simple breakdown of timing by site:
| Location | Best Month | Sunrise Golden Hour | Sunset Golden Hour | Key Challenge |
|---|---|---|---|---|
| Ayutthaya Historical Park | December | 6:10 AM to 6:40 AM | 5:30 PM to 6:00 PM | Crowds at Wat Mahathat |
| Sukhothai Historical Park | January | 6:20 AM to 6:50 AM | 5:40 PM to 6:10 PM | Large area requires bike to move |
| Phanom Rung | February | 6:15 AM to 6:45 AM | 5:45 PM to 6:15 PM | Steep climb to the sanctuary |
| Wat Rong Khun (White Temple) | November | 6:30 AM to 7:00 AM | 5:35 PM to 6:05 PM | Harsh reflections from white surface |
These times are for 2026. Always check a sunrise/sunset app the night before, as exact minutes shift.
The Gear You Need for Temple Golden Hour
You do not need a truckload of gear. But a few specific items make a real difference when shooting golden light photography at Thailand temples.
Camera body: Any modern DSLR or mirrorless with good dynamic range. Sony A7 IV, Canon R5, Nikon Z8, or Fujifilm X-T5 all work well. The key is having enough dynamic range to hold detail in both the bright sky and the shadowed temple interior.
Lens choice: A wide-angle zoom like a 16-35mm is your workhorse. It lets you capture the full scale of a temple with the sky as a backdrop. But also pack a 70-200mm or an 85mm prime. The longer focal length compresses the scene and makes the sun appear larger behind a stupa.
Filters: A 3-stop or 4-stop graduated neutral density filter is non-negotiable. It balances the bright sky with the darker foreground. Without it, you either blow out the sky or lose detail in the ruins. A circular polarizer also helps cut through haze and saturates the warm tones.
Tripod: A lightweight carbon fiber tripod is worth the weight. You will be shooting at low ISO for maximum quality, and shutter speeds can drop to 1/15th or slower during deep golden hour.
Pro tip from a veteran travel photographer: “I always carry a small flashlight or a headlamp with a warm LED. When shooting temple ruins at golden hour, I use it to paint light into the shadowed doorways or under a Buddha statue. It adds a subtle warmth that matches the ambient light perfectly.”
How to Set Up Your Shot: A Step-by-Step Process
Getting the shot right in camera saves hours of editing later. Follow this process for consistent results.
-
Arrive 60 minutes before golden hour. Use the extra time to walk the site, find your composition, and watch how the light moves. At Sukhothai, for example, the light hits the central chedi first, then spreads to the smaller satellite temples.
-
Set your camera to aperture priority mode. Choose f/8 to f/11 for maximum sharpness across the frame. This keeps the foreground ruin and the distant sky both in focus.
-
Meter for the highlights. Point your camera at the brightest part of the sky near the sun. Lock exposure with the AE-L button. Then recompose your shot. This prevents the sky from blowing out.
-
Place your graduated ND filter. Slide it down until the dark part covers the sky. Check the histogram. The sky should sit just below the right edge, and the ruins should sit in the middle third.
-
Set your white balance to “Daylight” or 5500K. Do not use Auto White Balance. Auto mode will try to neutralize the warm golden tones, which defeats the purpose. You want the amber glow.
-
Focus one third into the scene. For a typical composition with a temple in the foreground and the sun behind it, focus on the temple’s edge. Use live view and magnify to check sharpness.
-
Bracket your exposures. Shoot three frames at -1, 0, and +1 EV. This gives you insurance if the dynamic range exceeds your sensor’s ability. You can blend them later.
Common Mistakes and How to Avoid Them
Even experienced photographers slip up in the rush of golden hour. Here are the most frequent errors and the fix for each.
| Mistake | Why It Happens | The Fix |
|---|---|---|
| Blown out sky | Metering on the dark temple instead of the sky | Use spot metering on the sky, then recompose |
| Flat colors | Using Auto White Balance | Lock white balance to Daylight or 5500K |
| Soft images | Shooting at f/2.8 for bokeh | Stop down to f/8 or f/11 for depth of field |
| Lens flare | Sun just outside the frame | Use your hand or a lens hood to block the sun |
| No human element | Waiting for the scene to be empty | Include a monk, a cyclist, or a fellow photographer for scale |
Composition Tricks for Temple Ruins
The ruins themselves are beautiful, but great composition makes the difference between a snapshot and a portfolio piece.
Use leading lines. The stone pathways, the rows of Buddha statues, the long shadows cast by a setting sun. These all pull the viewer’s eye into the frame. At Wat Phra Si Sanphet in Ayutthaya, the three chedis line up perfectly. Shoot from the side so the line of chedis leads diagonally across the frame.
Frame within a frame. Many temples have broken doorways, collapsed windows, or stone arches. Use these to frame the main subject. At Phanom Rung, the sanctuary door frames the rising sun perfectly during certain weeks of the year.
Include a silhouette. When the sun is low and bright, expose for the sky and let the temple go dark. This creates a clean silhouette that emphasizes the shape of the ruin. This works especially well at Wat Arun in Bangkok, where the central prang has a distinctive, jagged outline.
Look for reflections. After the rainy season, many temple grounds have shallow pools of water. A puddle on the ground can reflect the golden sky and the temple, giving you a symmetrical shot. At Sukhothai, the large pond near Wat Sa Si is famous for mirror reflections at sunrise.
Best Temple Sites for Golden Light in 2026
While every temple in Thailand has potential, these three sites are the most photogenic for golden light photography.
Sukhothai Historical Park: This is the crown jewel. The ruins are spread across a large area with ponds, trees, and open sky. The morning light is exceptional because the site faces east. Arrive before sunrise and set up at the central pond. The reflection of Wat Mahathat in the still water with a pink sky behind it is one of the most iconic images in Thailand.
Ayutthaya Historical Park: The former capital has dozens of temples within a small area. Wat Mahathat with the Buddha head in the tree roots is the most famous spot, but it gets crowded. Go to Wat Ratchaburana instead. Its tall prang catches the sunset light beautifully, and there are fewer tourists.
Phanom Rung: This Khmer temple sits on an extinct volcano in Isaan province. The setting is dramatic. A long staircase leads up to the sanctuary, and the sun sets directly behind the central tower during certain months. February is ideal. The light streams through the doorways and illuminates the inner chamber.
For more ideas, check out our guide on what are the best hidden gems for landscape photography in Thailand.
Editing Golden Hour Temple Photos
You captured the shot. Now bring out the magic in post-processing.
- Start with the white balance. If you shot in RAW, you have flexibility. But resist the urge to cool it down. Golden hour photos should look warm. Aim for 5000K to 6000K depending on the scene.
- Boost contrast selectively. Use a curve adjustment to add contrast to the midtones. This makes the stone textures pop without crushing the shadows.
- Saturate the warm tones. Increase the orange and yellow saturation slightly. But be subtle. Overdone saturation looks artificial.
- Recover shadow detail. The temple ruins will be dark if you exposed for the sky. Use the shadow slider in Lightroom or the equivalent in your software. Pull it up until you see detail in the brick and stone.
- Add a slight vignette. This draws the eye to the center of the frame and mimics the natural darkening of the sky at the edges of the frame.
For a full workflow, read our guide on mastering asian landscape photography edits for stunning results.
Packing for a Temple Photography Trip
Your gear list matters. Here is what to bring for a week of temple photography in Thailand.
- Camera body and two lenses (wide zoom and telephoto)
- Graduated ND filter and circular polarizer
- Lightweight tripod with a ball head
- Extra batteries (cold mornings drain them faster)
- Lens cleaning cloth (dust is everywhere)
- A small flashlight for light painting
- A hat and sunscreen (you will be outside)
- A reusable water bottle
- A rain cover for your camera (afternoon showers happen even in cool season)
Final Thoughts on Capturing the Golden Light
Thailand’s temple ruins have stood for centuries. They have seen countless sunrises and sunsets. But the light changes every single day. The angle shifts. The clouds rearrange. The humidity rises or falls. Your job is to be there, ready, with your camera set up and your composition locked in.
The best golden light photography at Thailand temples comes from a combination of preparation and patience. Know your site. Know the time of year. Know your gear. Then let the light do the rest.
When you get that one frame where the sky is on fire and the ancient stone glows like it is alive, you will understand why photographers keep coming back to this corner of the world. That is the moment you came for. Go get it.